How to Enable or Disable Multi-touch on Windows 7
3 Easy Ways to Enable or Disable Multi-touch on Windows 7
While there is room for heated debate on which company launched multi-touch on their devices, one thing is clear as day, it is a handy feature. Multi-touch enables users to manipulate data and navigate their devices, in this case, their computers, using multiple touch points simultaneously. Multi-touch is one of the many features that show just how functional the integration of hardware and software can be. Windows 7 has the multi-touch feature that works on multi-touch screen, multi-touchpad and multi-touch gestures. This article explains how to enable multi-touch Windows 7. Multi-touch can only be enabled if all drivers were installed.
Part 1: How to Enable Multi-touch Feature in Windows 7
Part 2: How to Disable Multi-Touch Feature in Windows 7
Part 3: How to Test Whether Multi-touch is Working
Part 1: How to Enable Multi-touch Feature in Windows 7
Method 1: Using Control Panel
Step 1: Launch Control Panel by clicking its icon or click the Start icon > Control Panel. Navigate to “Hardware and Sound” then proceed by clicking “Pen and Touch”.
Step 2: Click the “Touch” tab. It is the second tab from the right.
Step 3: Check the “Enable multi-touch gestures and inking” checkbox.
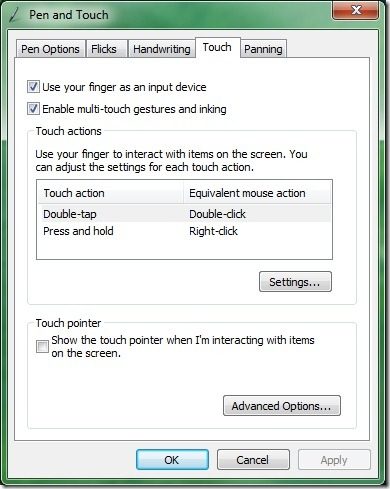
Step 4: Click “Apply” then “Ok”.
Method 2: Using Device Manager
Step 1: Launch Device Manager by clicking the Start icon and typing ‘Device Manager’ in the search box.
Step 2: Navigate to Human Interfaces Devices and expand it by clicking.
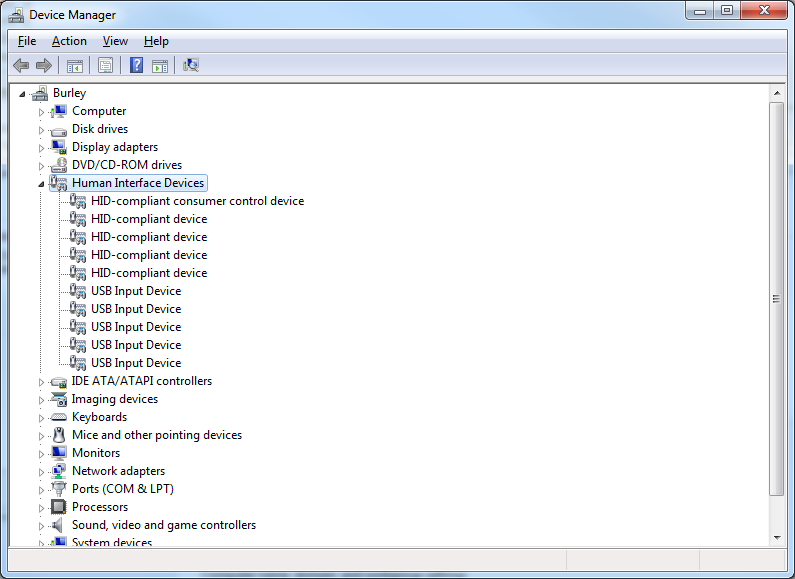
Step 3: Right-click “HID-compliant touch screen” and click Enable.
Step 4: Close Device Manager to save changes.
Method 3: Enable Multi-Touch TouchPad
Step 1: Click the Start icon and navigate to Control Panel.
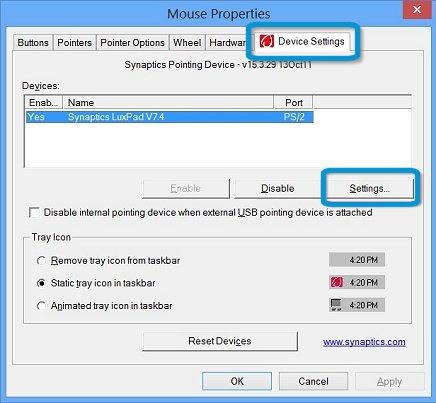
Step 2: Under “Hardware and Sound” click Mouse.
Step 3: In the Mouse Properties window click the “Device Settings” tab. It is the last tab on the list of tabs.
Step 4: Click the “Settings” button that appears under the “Devices” section.
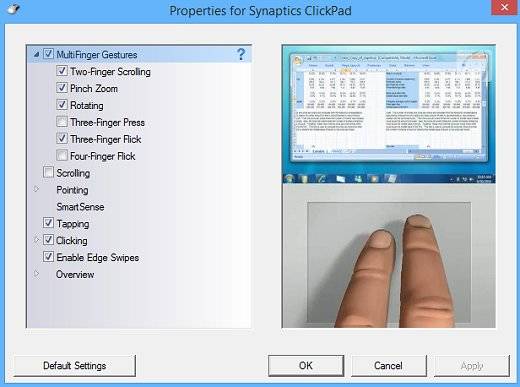
Step 5: Check the “MultiFinger Gestures” checkbox and any other features you wish to have such as two-finger scrolling, pinch zoom, rotating, three-finger press, three-finger flick, and scrolling to enable multi touch scrolling windows 7 etc.
Part 2: How to Disable Multi-Touch Feature in Windows 7
To disable Multi-touch, simply reverse the procedure. If in doubt, follow the steps listed below.
Method 1: Disable using Control Panel
Step 1: Launch Control Panel by clicking the Start Menu > Control Panel.
Step 2: Click Hardware and Sound then click Pen and Touch.
Step 3: Click the Touch tab and uncheck the “Enable multi-touch gestures and inking” checkbox.
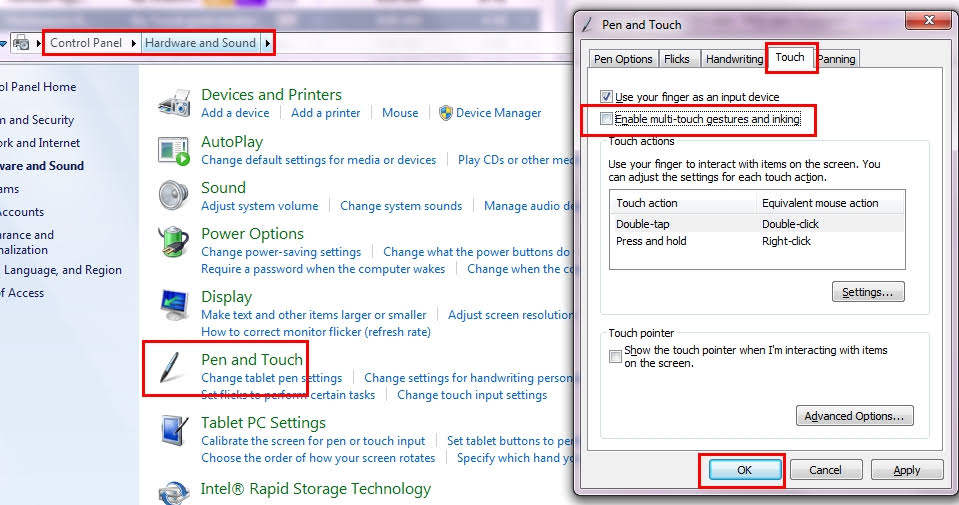
Step 4: Click “Apply” then “Ok”.
Method 2: Disable Multi-touch Screen using Device Manager
Step 1: Open device manager by clicking the Start Menu, typing ‘Device Manager’ in the search bar and selecting the relevant result.
Step 2: Click “Human Interface Devices”.
Step 3: Right-click HID-complaint touch screen and click Disable.
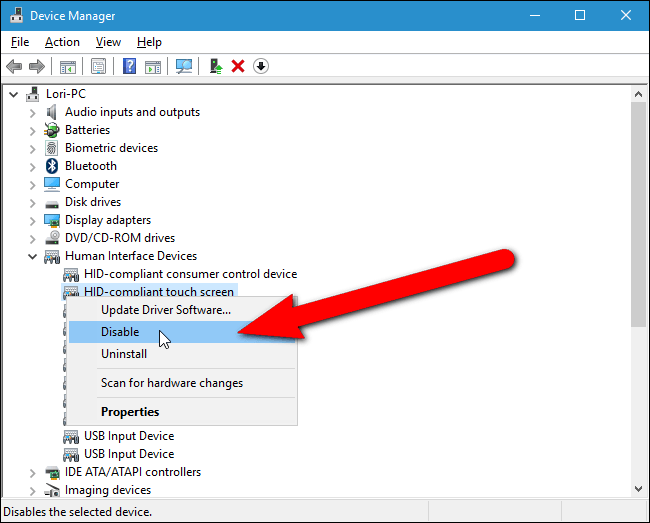
Step 4: Click “Apply” then “Ok”.
Part 3: How to Test Whether Multi-touch is Working
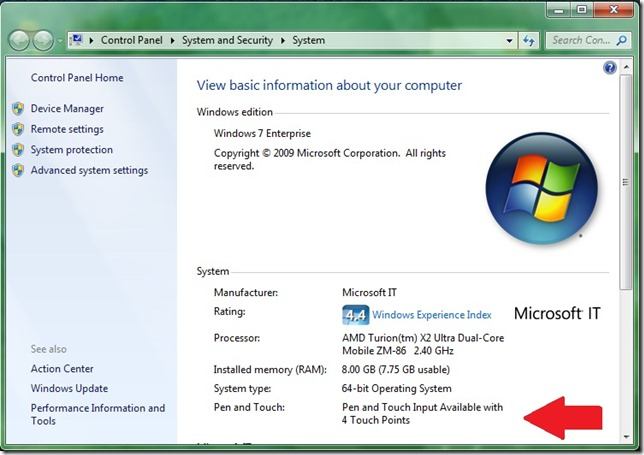
To test whether you’ve successfully enable multi touch trackpad windows 7, click the Start menu, right-click Computer and click Properties from the drop-down list. Check that “Pen and Touch Input Available with 4 touch points” is listed next to Pen and Touch. Alternatively, launch a productivity software such as Paint, select a marker or pencil and swipe three fingers across the screen. If three lines are drawn, then multi-touch has been enabled on your device.
Conclusion
Enabling multi-touch is simple and straight-forward. This article gives more than one method to enable or disable the feature. If you have forgotten your Windows login password, we recommend using Windows Password Key to recover or reset it.
- Related Articles
- Windows 7 Error Code 0XC004E003 Occurred, How to Fix?
- How to Fix Stop Error Code 0x0000007E on Windows 7
- How to Fix Error 0xc00000e9 on Windows 7
