3 Ways to Fix the Start Menu Stopped Working or Not Open in Windows 10
3 Ways to Fix the Start Menu Stopped Working or Not Open in Windows 10
The Start Menu on your Windows 10 PC allows you to get to almost every app on your computer. From letting you access the settings panel to helping you launch your word processor, the Start Menu is the place where everything starts from (hence the name Start Menu).
While it does not happen too often, sometimes the Start Menu starts behaving weird. When you click on it, it may or may not open, and it also causes the Search panel to get frozen adding to your troubles.
If that has happened to you, it must have left you wondering what exactly caused that as the Start Menu issues are very rare. It could be due to a bug, an issue with the Windows installation, and so on.
Regardless of how the issue has been caused, here are some ways to fix the issue and get the Start Menu back to its normal behavior. Here you go, folks:
Method 1: Repaire the Corrupted Files
The Start Menu issue might have caused due to the system files being corrupt. If that's the case, then you will need to check your PC for any corrupt files and fix them, if there are any. Here's how to do that:
- 1. Open the Task Manager on your Windows 10 PC by pressing Ctrl + Alt + Del keys together on your keyboard. You can also launch it by right-clicking on the Taskbar and selecting Task manager.

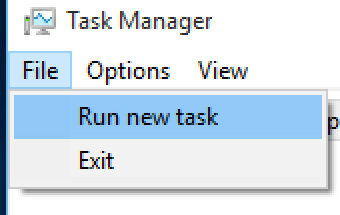
- 2. When Task Manager launches, click on the option that says More details and a new menu will appear. Then, choose the File menu and select Run new task to run the file scanning task.

- 3. On the following screen, type in powershell in the input box and click on OK to run the task. Also, make sure to checkmark the box given beneath the field as it is a must.

- 4. When the Powershell window opens, type in the following command "sfc /scannow" and press Enter.
What the above command will do is it will scan your computer for corrupted files and help you fix them to avoid errors.That should have resolved the Start Menu issue on your PC. If that didn't, here's another way:
Method 2: Uninstall and then Re-install the Windows Apps
Sometimes the issue might have been caused by the Windows apps on the system. If that's the case, you need to reinstall the apps to ensure everything's fine. Here's how to do that:
- 1. Open a new Powershell window as described in the above section.
- 2. When a Powershell window opens, type in the following command and hit Enter:
"$($_.InstallLocation)\AppXManifest.xml"} - 3. Reboot your PC and see if that resolved the Start Menu issues.
It should do the job for you. If that still didn't, here's one more way to fix the issue:
Method 3: Use a new User Account
Sometimes the issue might have been caused by the user account files. In such a case, you will need to create a new user account and use it for your computer sessions. Here's how to do that:
- 1. Launch a Powershell window as shown in the first section of this article.
- 2. When a Powershell window launches, type in the following command “net user Username Password /add” and press Enter.
Note: In the above command, make sure to replace Username with the username you want for the new account and Password with the password you want for the new account. - 3. Once the user account is created, log off from your current account. Then, log back in using the new account.
So, above are three of the ways to fix the Start Menu in Windows 10. If you already have an account on your Windows 10 PC in which the Start Menu worked fine but unfortunately you have forgotten the password for that account, then here's how to recover the password with Windows Password Key and get access to that account to then see the Start Menu working normally.
- Related Articles
- Top 5 Ways to Open Windows 10 Explorer
- Quick Way to Clear Cookies Firefox on Windows 10
- Windows 10 Regedit Won't Open, How to Fix
