Top 3 Lenovo BIOS Update Utility
How to Update Lenovo BIOS on Windows 10/8/8.1/7
BIOS stands for Basic Input Output System, also called ROM-BIOS. It’s a group of embedded process in your computer offering the lowest and most basic hardware controlling for computer. To be frank, it’s the hinge between hardware appliance and software process.
Just like Windows software and drivers, there are also new updates released for BIOS from time to time. Updating BIOS is the easiest way to gain the new functions, enhance the stability of BIOS and fix some bugs of the former version. This post aims to introduce 3 Lenovo BIOS update utility to help Lenovo users improve the performance of their computer.
- Part 1: Top 3 BIOS Update Utility for Lenovo Computer
- Part 2: Guide for Lenovo BIOS Update on Windows 7/8/8.1/10
Part 1: Top 3 BIOS Update Utility for Lenovo Computer
1. BIOS Update Utility EXE
The latest version 2.39 of BIOS Update Utility EXE is officially released on May 5, 2017. It supports Windows 10 (64 bit), Windows 8.1 (64 bit), Windows 8 (64 bit), Windows 7 (32, 64 bit). This package updates the UEFI BIOS (including system program and Embedded Controller program) stored in the Lenovo computer to fix problems, add new functions and expand functions.
There are also new features and functions in this new update:
- Updated the CPU microcode
- Fixed an issue of UEFI BIOS update is not completed after resume from sleep state by timer
- Updated description in Lenovo Setup menu
2. BIOS Update Utility for Windows 32-bit EXE
The version 3.25 of BIOS Update Utility for Windows 32-bit EXE supports Windows 7 (32 bit), Windows Vista (32 bit) and Windows XP Home and Professional edition.
There are also new features and changes in this version.
- Newly updated BIOS version
- Added support for the function of disable AMT via WMI.
- Embedded Controller Program version
- New functions and enhancement
- Correction to existing function
3. BIOS Update Utility for Windows 64-bit
Along with the 32 bit version, BIOS Update Utility for Windows 64-bit is designed for Windows 7 (64 bit), Windows Vista (64 bit) and Windows XP (64 bit). The new features are similar to the 32 bit version. This program is language independent and can be used with any language system.
Part 2: Guide for Lenovo BIOS Update on Windows 7/8/8.1/10
After downloading the BIOS update utility on your Lenovo desktop or laptop, follow the steps below to update Lenovo BIOS on Windows 7/8/8.1/10 easily(here we take ThinkPad for example).
- Make sure the AC adapter is firmly connected to the target computer, Locate the directory where the file was downloaded, double-click it to extract file “US.EXE" for 32-bit, "U6.EXE" for 64 bit Windows
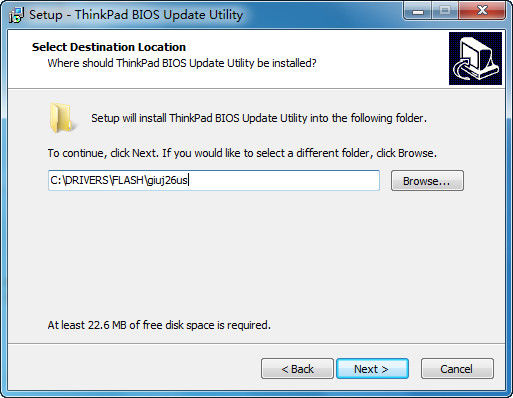
- In the "Select Destination Location" window, click “Next”. If you would like to select a different folder, click “Browse”.
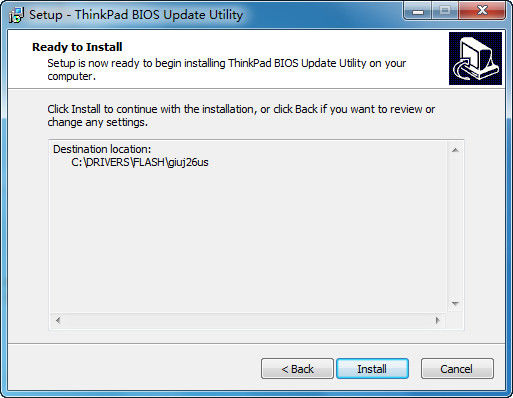
- In the "Ready to Install" window, click “Install”.
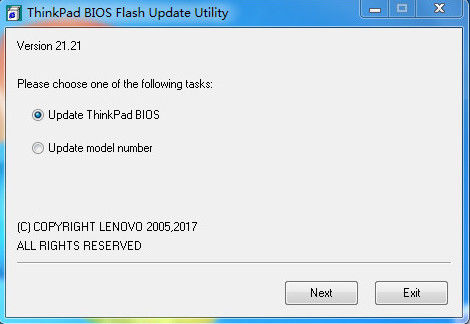
- After the file is installed successfully, Select “Update ThinkPad BIOS” and follow the instructions on the screen.
- After the update has been completed, the program shows a message "Flash Update has been successfully completed...". Follow the instructions on the screen to restart the computer.
With the 3 effective BIOS update utility, you have a clear picture of how to update BIOS in Windows 7/8/10 for your Lenovo laptop. If you still have any questions, you are warmed welcomed to share with us by commenting below.
- Related Articles
- Lenovo Boot Menu Key on Windows 7/8/8.1/10
- How to Recover Login Password on UEFI Based Lenovo
- 3 Best Free Windows Password Reset Tools in 2017
