Top 3 Ways to Disable or Enable Windows 10 Password Expiration
How to Disable or Enable Windows 10 Password Expiration
Of the many computer operating systems available, Windows 10 is one of the most popular. One of its features that isn’t known as much as it should, is the Password Expiration feature. And rightly so because it is disabled by default. The feature allows you to expire a password after a certain duration of time hence the “windows 10 password expired and must be changed”. This article outlines how to disable or enable Windows 10 password expiration. Though most users do not fancy creating a different password after getting used to it, the password expiration feature can be useful.
Method 1: Disable/Enable Windows 10 Password Expiration via Computer Management
To disable password expiration Windows 10 Home using computer management, follow the procedure below.
Step 1: To open Computer Management, launch file manager, right-click This PC > Manage.
.jpg)
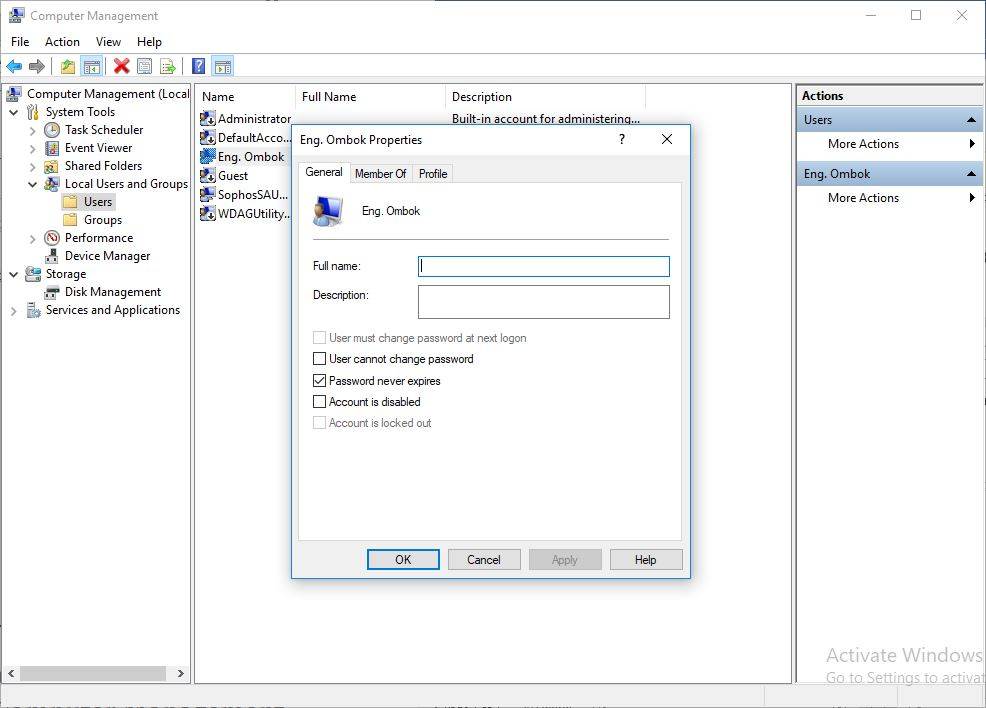
Step 2: Under “System Tools” click “Local Users and Groups” then click “Users”.
Step 3: In the middle section, click the username of the account whose password you wish to expire.
Step 4: Check the “Password never expired” checkbox, click “Apply” then “Ok”.
To enable password using computer management, simply uncheck the “Password never expires” checkbox click “Apply” then “Ok”.
Method 2: Using Elevated Command Prompt to Fix Windows 10 Password Expired Cannot Login
If for any reason, you can’t access computer management, you can use elevated command prompt. Follow the procedure below.
Step 1: Open elevated command prompt by searching it on Cortana search bar, right-clicking the result and clicking Run as Admin.
Step 2: Type: wmic UserAccount where Name='User Name' set PasswordExpires=False. And press Enter.
Step 3: The notification “Property(s) update successful” shows that you have successfully disabled the password of the name you set.
To enable password expiration type: UserAccount where Name='User Name' set PasswordExpires=False and press enter. Replace the words ‘User Name’ with the user name of the account whose password you wish to expire.)
Method 3: Using netplwiz to Solve Windows 10 Password Notification Not Showing
Step 1: Launch the run utility by pressing Windows and the R key on your keyboard simultaneously. Type “netplwiz” and hit Enter.
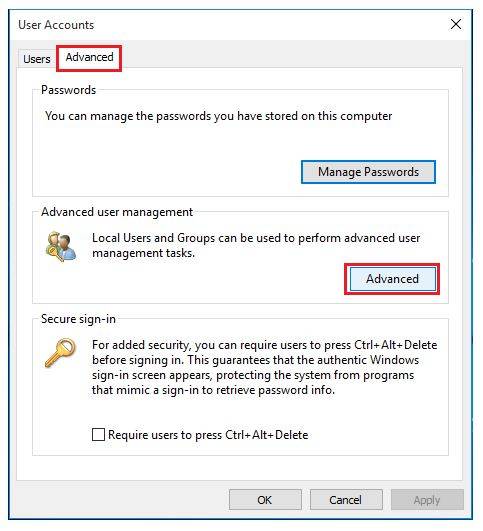
Step 2: Click the “Advanced” tab and under “Advanced user management” click the “Advanced” button.
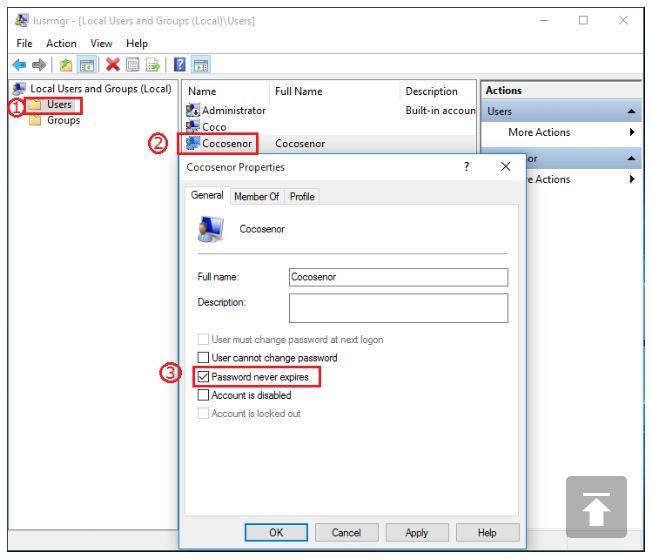
Step 3: Click “Users”. In the middle section select your account and check the “Password never expires” checkbox. Click “Apply” then “Ok”.
Method 4: Using Local Group Policy Editor
Step 1: Launch Local Group Policy Editor by pressing the Windows button and R key on your keyboard simultaneously, typing gpedit.msc and hitting Enter.
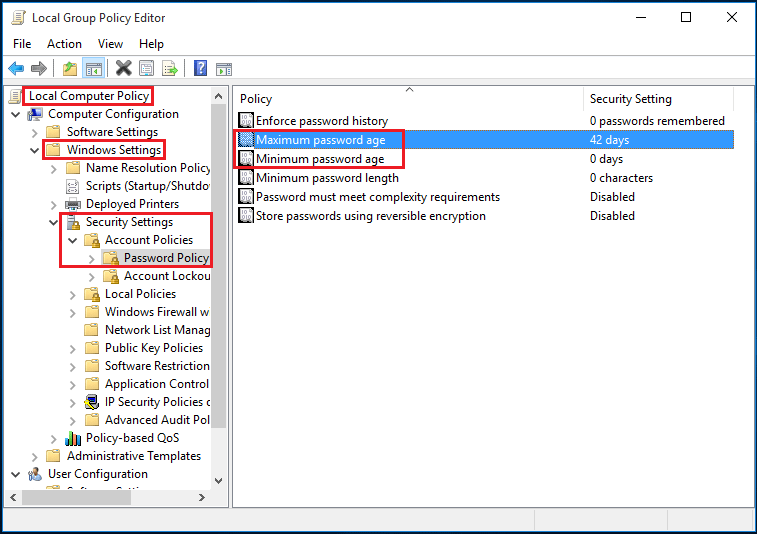
Step 2: Click Computer configuration > Windows Settings > Security Settings Account Policies > Password Policy.
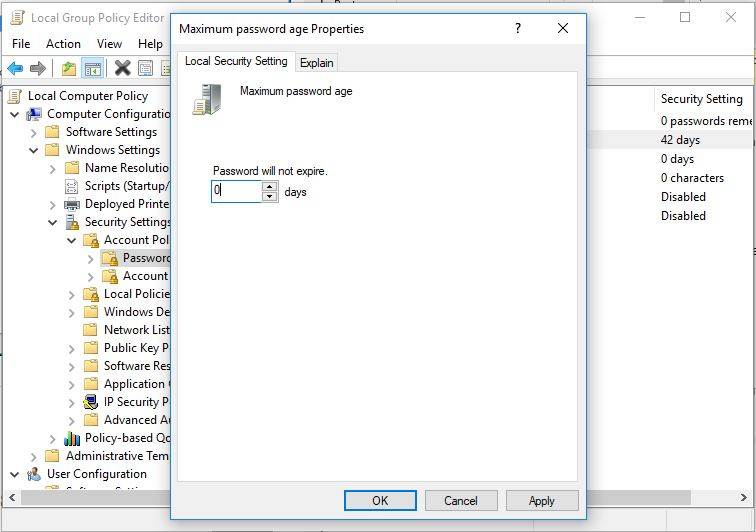
Step 3: Click “Maximum password age” and set it to 0.
Step 4: Click “Apply” then “Save”.
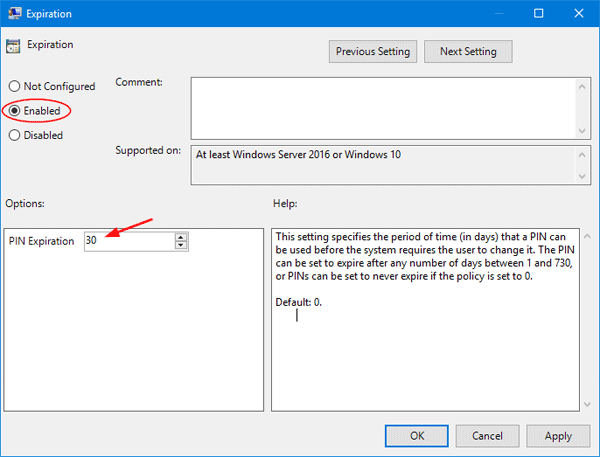
Alternatively, after getting to step 2, click “Expiration” and select one of either “Enabled” or “Disabled”.
Conclusion
If your Windows 10 password expiration notification not showing ensure that the taskbar notifications are enabled. If Windows 10 password expired cannot login boot your computer in safe mode and use the admin account. Users who’ve forgotten their Windows login passwords can use Windows Password Key to recover and reset them.
- Related Articles
- How to Add Security Questions to Local User Accounts in Windows 10
- Top 9 Windows 10 Passwords Issues and Solutions
- Best 3 Ways to Disable BitLocker Encryption for Windows 10
.JPG)
