Top 4 Ways to Fix Windows 10 Screensaver Not Working 2018
Top 4 Ways to Fix Windows 10 Screensaver Not Working 2017
“I have recently upgraded from windows 8.1 to windows 10. My screen saver does not appear to activate now. I have tried looking into my power options and I don't see anything wrong. Screen saver works fine in preview mode, just never triggers no matter what I set the interval to. How can I fix window 10 screensaver not working?”
Keep computer open when you are away for several hours will cause damage to the monitor. With screensaver, you can easily avoid the partition damage to the monitor. However, some users reported that screensaver doesn’t work on Windows 10 after upgrading from Windows 7/8. Some of them tried to reset or refresh computer for several times, but still cannot activate the screensaver. If you are unluckily bothered by this issue, you can find the most effective solutions to fix screensaver won't work on windows 10 in this post.
- Way 1: Unplug Unnecessary Devices to Fix Screensaver Not Starting on Win 10
- Way 2: Fix Windows 10 Screensaver Not Working By Updating Windows Drivers
- Way 3: Reset Power Management Options to Enable Windows 10 Screensaver
- Way 4: Activate Window 10 Screensaver by Checking Screen Saver Setting
Way 1: Unplug Unnecessary Devices to Fix Screensaver Not Starting on Win 10
In many cases, Windows 10 screensaver not turning on problem can be caused by external devices plugged in computer. So the first fix is to disconnect unnecessary devices, such as Logitech, Razer, PlayStation, Xbox etc.
Way 2: Fix Windows 10 Screensaver Not Working By Updating Windows Drivers
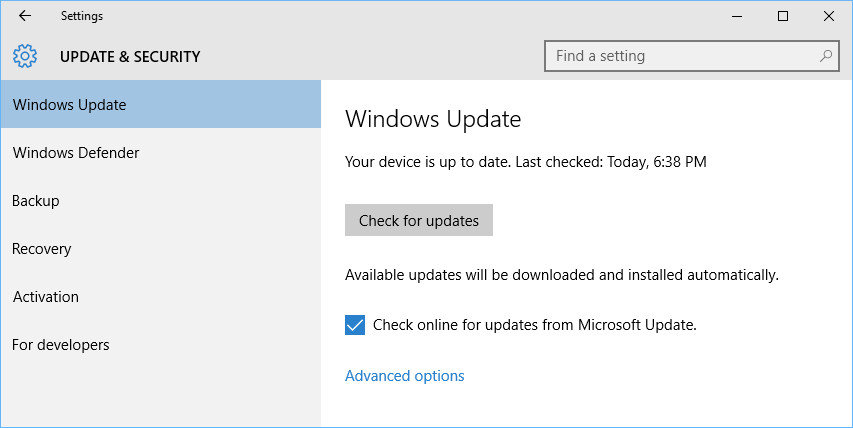
Another reason for Windows 10 screensaver won’t activate can be the out-dated Windows driver. Open settings from the Start menu, and now you can see “Windows Update” option. Check if there are new updates available, you can also click “Check for updates” to download and install the latest Windows updates.
Way 3: Reset Power Management Options to Enable Windows 10 Screensaver
When the Power Management Options on the computer have been changed, it could cause the screensaver not starting automatically on Windows 10. Reset the settings to default with the following steps:
- Type “power options” in the search bar, click the “Power Option” when it appears
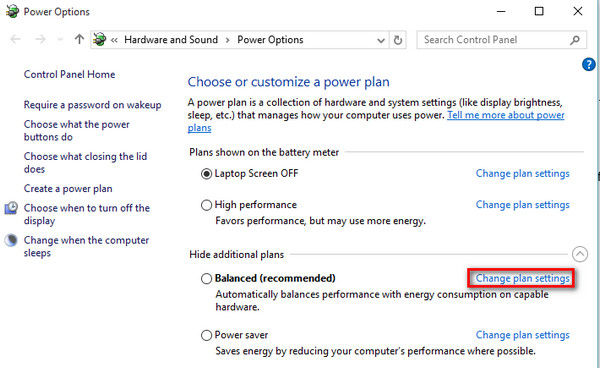
- Now you’ll see the “Select a power plan” page, choose either Balanced or High Performance from the list of power plans and click the "Change plan settings" link
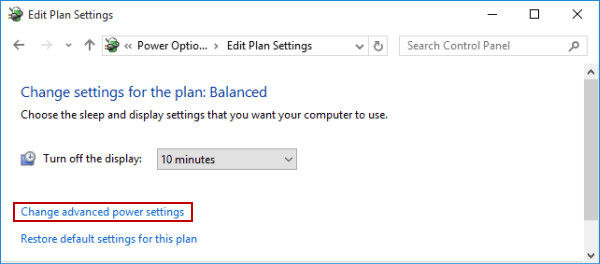
- In the "Edit plan settings" window, ensure that "Turn off the display" is set to 20 minutes (if you have the option) and then click the "Change advanced power settings" link
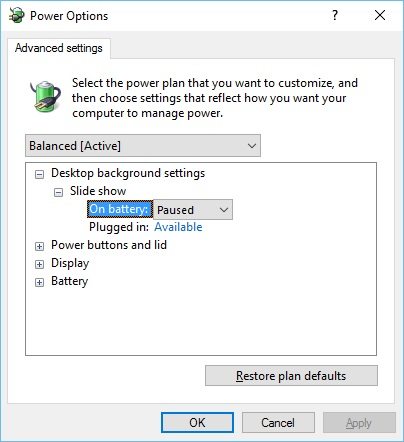
- Click the "Restore plan defaults" button in the “Power Options” windows and then click “Apply” to enable screensaver on Windows 10 successfully.
Way 4: Activate Window 10 Screensaver by Checking Screen Saver Setting
Sometimes Windows 10 screen saver not working properly after reboot might because it isn’t enabled or configured properly. Follow the steps to check the screen saver settings:
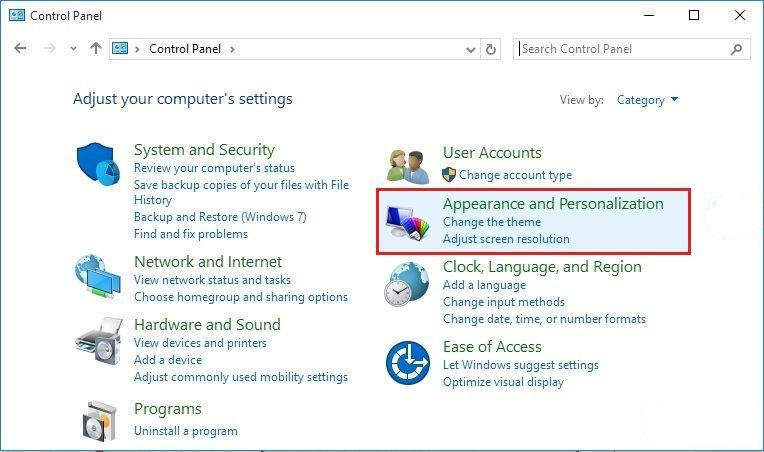
- Right click on the Start menu button and then select “Control Panel”. Click on “Appearance and Personalization”
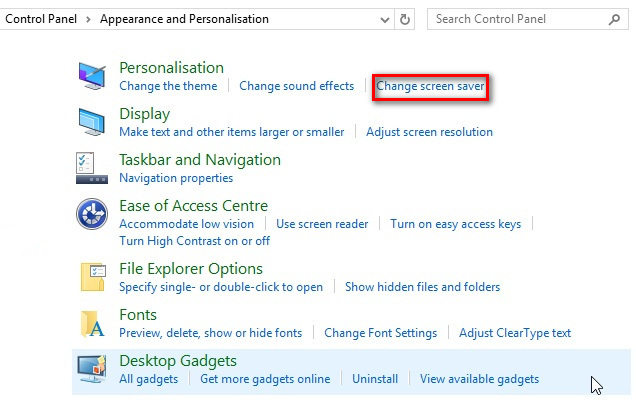
- Now you can see several options. choose “Change screen saver” under “Personalization”
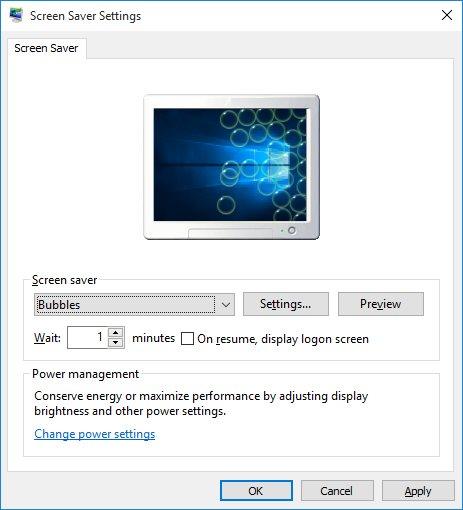
- The “Screen Saver Settings” window will pop out, select which screen saver you’d like to use, customize it and set the time before it appears. Double check that everything is configured correctly.
Now you got to know how to activate windows 10 screensaver clearly. If you still have the same problem about the screensaver on Windows 7/8, the fixes are similar. Any questions about this post are warmly welcomed!
- Reset/Remove Windows admin and other user password for local/domain account.
- Create a new local/domain admin account to unlock your computer.
- Change your Microsoft account password offline.
- Fully support Windows 10/8.1/8/7/Vista/XP, Windows Server 2012 (R2)/2008 (R2)/2003 (R2).
- Related Articles
- Crack Laptop Password
- How to Reset Microsoft Account Password
- How to boot from USB Flash Drive in Windows
